The foundation of the injection molding process is the mold itself. The most common style is the straight-pull mold. This mold has two halves, a core, and a cavity. The halves of the mold, usually made from steel or aluminum, are held together in the molding press by mechanical clamps or hydraulic pressure. Molten plastic then fills the cavity to create the desired part. After the plastic cools, the halves of the mold are pulled apart.
The halves of the mold work like this:
Core (B Side): The core is usually the interior or non-cosmetic side of the part. The core side also contains the ejection mechanism that pushes the completed part out of the mold.
Cavity (A Side): The cavity is the void inside the mold that the molten plastic fills. Plastic enters the mold from the cavity side and forms the final shape of the part. The cavity side usually forms the cosmetic side of the part.
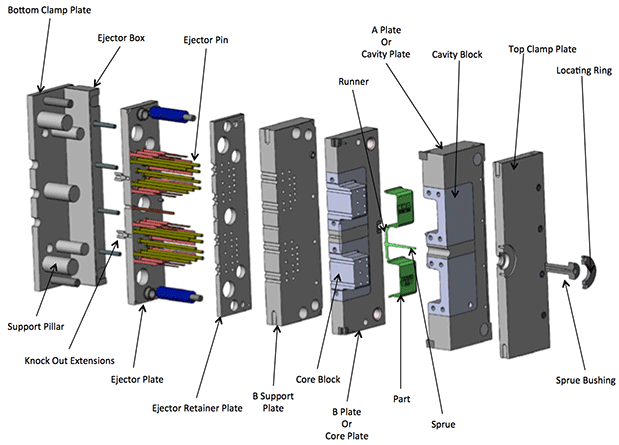
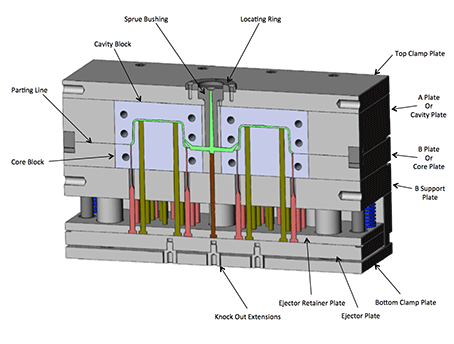
Mold Base
The mold core and mold cavity are each mounted onto the mold base, which is then fixed to platens inside the injection-molding machine.
The front half or the cavity side of the mold base includes:
- Support plate – used to mount the mold
- Locating ring – aligns the mold base with the nozzle
- Sprue bushing – helps material flow from the nozzle
- Runner – passes material from the sprue to the part
The rear half or the cavity side of the mold base includes:
- Support plate – used to mount the mold.
- Ejection system – when the mold halves separate after a part properly cools, the ejector bar pushes the ejector plate forward inside the ejector box, which in turn causes the ejector pins to push the part out of the open mold cavity.
Runner System
A runner system directs molten resin into the mold. Designing the runner is as important as designing the part. It is critical that the material flows smoothly and fills correctly – repeatedly at a rapid rate. Resin flows through the mold in the following order:
- Sprue –The starting point for molten resin. It is typically larger than the rest of the system to encourage proper flow.
- Runners –From the sprue, the resin flows through the runner to each cavity in the mold. The design of the runner allows for even flow of resin while using as little resin as possible.
- Gates –At the end of each runner, the molten plastic enters the cavity through a gate that directs the flow. Gates come in many varieties and are explained in more detail below.
The molten plastic that solidifies inside these runners is attached to the part and must be separated after the part ejects from the mold. However, hot runner systems independently heat the channels, which melts the contained material and makes it easy to remove from the part.

Gates
Gates are important because they direct the flow of resin. Proper resin flow is essential for the creation of defect-free parts. This makes the gate design an important part of the overall mold design. Below are a few examples of gate types:
- Edge –Edge gates inject plastic into the cavity through the edge of the part. Injecting the plastic through the edge leaves the part connected to the runner when it’s ejected. It’s easy to break or trim the runner off, but there will be a small imperfection called a vestige.
- Tunnel –Tunnel gates inject plastic into the cavity from a port that’s cut into the core side of the mold. The tunnel gate must also be cut from the part for a smooth surface.
- Post –Post gates allow the plastic to be shot into the back of the mold via the paths of ejector pins. The part ejects with the post gate attached, and it will need to be cut from the part.
- Hot tips –Hot tips are gates that connect the sprue directly to the part. A tip is placed in the part’s cavity and heated so the part doesn’t stick to it, but there will be a dimple on the part to allow the plastic to flow properly. Molds that use hot tips are more expensive than most others. However, there is little to no wasted plastic because there is no runner. This is often the best choice for higher volume parts.
Cooling
During injection molding, cooling is often the most time-consuming part of the process. Improper cooling – a common mistake – can increase cycle time and leave parts with cosmetic defects. Appropriate cooling channels can reduce cooling time and increase the productivity of a mold, which can reduce the price of the product. Optimal cooling is reached through a systematic review of the part, the mold, and the resin. When warranted the effectiveness of the mold design can be analyzed through specialty software.
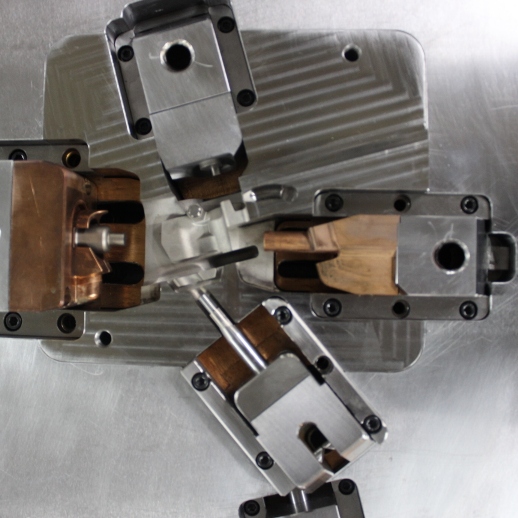
Side Action
Side-action can make more complex parts using a standard mold. Add-ons such as slides, or side-cores can create openings, undercuts, threads or complex features in a part. Most of these devices slide into the part cavity through the side of the mold, and are therefore known as slides, or side-action.
The most common type of side-action is a side-core, which allows the molding of an external undercut. Other devices enter through the end of the mold along the parting direction, such as internal lifter cores, which can form an internal undercut. An unscrewing device can mold threads into the part and rotate out of the mold after forming the threads.